Sunday, 1 December 2013

Circle Center Mark

When you are creating Revit family’s using circles (especially Profiles) it can be difficult to constrain circles to parameters or relocate the profile. An easy way to help with this process is to have a visible Circle Center Mark. This will allow you to align, move, lock or constrain with parameters using the center mark as a reference point, which is not possible without it.

Just select the Circle and in the properties tick the Center Mark Visible Parameter.


Now you have a point to reference.


Opening with Worksets

If you are working on a LARGE Revit Project, you have the ability to speed up the file opening process by only having the editable worksets loaded on opening. Everybody relinquishes their worksets when Synchronising, this means that there will be virtually nothing visible on opening.

You will have to manually open the worksets before you start work on the project. This allows the user to only open the worksets they require rather that the entire workset list.

To open the worksets, click the ManageWorksets tool and select the worksets and select Open, either in the drop down or on the right hand side of the dialogue box. (You can select multiple Named worksets by holding the ‘Ctrl’ key down on the keyboard)


Now you can start work!


To set this up on a Central file all you need to do is when you are creating the Central file you select the ‘Open workset default:’ and set it to Editable. (this process is usually handled by the Model Manager)


A continuation of the process is under the Manage Links tool, called Manage Worksets.

When you are Linking in Revit Models, you have an added feature under the Manage Links Tool. Which allows you to control the Worksets that are loaded with your linked files.

This tool works in a similar way to picking what worksets you want opened when you open your Revit Project file, but works on a Linked file. 


Workset Visibility

Worksets are a great way of controlling and associating elements in the Revit work environment. This process is especially helpful when dealing with Linked Revit files and Linked (or imported) DWG files.


You can control overall visibility in a project when you link Revit models (or Dwg’s) into other Revit projects. For example, it is best practice to have the ‘Visible in all Views’ unticked so that none of the elements appear in every view inside of your project as a default. The visibility of these linked files can be set-up individually in the View Templates or the Visibility Graphics. Also, have a workset specifically created (and named accordingly, refer Best Practices Guide) for each Linked model (or Dwg) will allow for greater control.


Worksets can also improve the performance of the system by being displayed as needed, avoiding the memory-intensive display of parts of the project building that aren’t necessary for a specific design activity.

To identify visibility requirements, determine the frequency with which the elements in the workset display in the project.


Tuesday, 19 November 2013

Setting Maximum and Minimum Values to Parameters

When you are creating Families in Revit there is often times where you would like to set maximum and minimum values for a parameter. This can be done using a simple nested ‘If’ statement in the formula.

In the example we would like to specify a maximum and minimum range for a length of an object. For this we will need 2 parameters….

Length – this parameter is the adjustable length of the object in question, this can be set to any amount without limitation. (For example this could be used to describe the distance from the object to a reference point)
Length Actual – This is the actual length of the object that is limited to a maximum and minimum amount.

The Length parameter is manually input (or determined) by the user.

The Length Actual then needs a formula applied to set it maximum and minimum values, in this example we are going to set a maximum amount of 2400 and a minimum amount of 1200.

The formula for Length Actual would read…..

=if(Length < 1200, 1200, (if(Length > 2400, 2400, Length)))

This formula reads….

If the Length is less than 1200 then use 1200, if the Length is greater than 2400 then use 2400, if the Length is between 1200 and 2400 then use the Length value.


(The ‘mm’ units get automatically added by Revit)


Thursday, 31 October 2013

Equal Dimensions Plus More

The Equal Dimension is a very handy tool when dimensioning inside of Revit. (But there is more than just Equals)


Once you have created an Equal Dimension you can change how the Equality Symbol is displayed.

Select the Equal Dimension String

Go to the Instance Properties, there is an Equality Display Parameter, and here you can pick Value, Equality Text or Equality Formula.


The Value, will display the actual Dimension Value.

The Equality Text will show ‘EQ’, or you have the ability to change this text in the Edit Type Properties in the Dimension Style (down the bottom). 


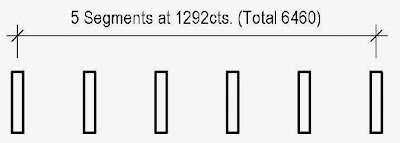
The Equality Formula allows you to customise what is shown by selecting different dimension parameters. Adding Prefixes and Suffixes as required. (The formula is Parametric, so it will update if the elements move)


In this example I have added Number of Segments, Length of Segments and Total Length. Adding additional Prefix and Suffix text.


The last thing to alter in the type properties is the ability to change how the Equality Witness Display is represented in the Dimension.


In this example I have set the Equality Witness Display to Hide. 

The elements are still controlled by the equal dimension even though the Witness lines have been hidden.

Tuesday, 29 October 2013

White Text on a Black Background

This is a bit of a strange anomaly in Revit. If you have an object and it’s colours is Black (for example, a sign), if you try and put white Text on it the text won’t show. (This is because Revit will show white text as black for visibility purposes, especially if you have your screen background colour set to white)


To fix this problem, change the RGB colour setting of the Text from 255-255-255 (white) to 255-255-254 (it is technically not white but you will never know the difference)


Spot Slope Annotations on Ramps


If you have drawn an Element (Slab, Roof, etc.) with a slope, and you want to add a Slope Annotation in a Plan View, you can use the Spot Slope tool to add the Slope direction and the value (The Units can be adjusted to alternate representations)

This Example below is showing 2 different Unit Values


This is a great tool, except for Ramps in a Plan View. For some reason Revit 2013 won’t allow you to place a spot slope. (Unfortunately they haven’t fixed this in Revit 2014)


So here is the magic work around!!!

  • Open a 3D View showing the ramp and set it to a Top-down view (click on the Top of the View Cube).
  • Use the Spot Slope tool to place a slope arrow on the ramp in the 3D View. (It works in 3D!)


    • Then Select the Spot Slope and Cut to Clipboard (Ctrl+x)
    • Open the Plan View, and in the Modify Tab choose Paste – Aligned to Current View.
    • Congratulations, you have beaten Revit!


    Thursday, 17 October 2013

    Roof Outline Creation


    When you are creating floor plan drawings and need to dash the roof line (or slab line) over. There is a quick and easy way of creating this linework without having to resort to detail linework.

    In this example we are going to use a Level  1 with a Roof at Level 2

    On you Level 1 Floor Plan, go into the View Properties and set Underlay to Level 2. This will show the Roof Outline as Halftone.


    All you need to do now is go to the Modify Ribbon and the  linework tool and pick the Roof Edge using the <Overhead> (or other accepted Linestyle) and it changes the outline of the roof to that line style.


    Set the Underlay to none and you are done!!!
     
    The best thing about this way of showing the linework is that it is linked to the roof and if the roof layout changes it will update the linework (with a couple of exceptions).


    Tab Key Selection


    The ‘Tab’ Key is a very good selection tool not only allowing you to cycle through your selection, but if you highlight a wall (by hovering your mouse over the element) and then hit the ‘Tab’ Key it will select all of the walls connected (Chain of Walls). This also works with Linework, etc,
    (But there is more, read on)


    An addition to this is if you select a wall and then move to another wall on the same Chain of walls, then hit the ‘Tab’ Key, it will select all of the walls in between.
    Moving the cursor to the end of the wall that is closer to the chain you would like to select, and then hitting the ‘Tab’ Key will allow you to select the chain of walls (in between) you require.


    Thursday, 10 October 2013

    Rotating Elevations

    If you need to create an Elevation View to a non-perpendicular Element (in this example a wall), when you place the Elevation it will automatically snap to be parallel to the Element. A very handy feature. (Keep Reading! That isn’t it!)


    If the element gets re-designed and its orientation changes, so that the Elevation is no longer parallel.


    Your first instinct is to select the elevation and go to the Rotation tool, this will work but is a long and tedious process of repositioning the rotation base point, etc…..


    If you select the circle symbol of the Elevation, there is a small rotation symbol that allows you to quickly rotate the elevation view and re-snap to the Element alignment. Easy!!!

    Tuesday, 8 October 2013

    Super Nudge

    When you select an element in Revit, you can use the arrow keys to move it around (‘nudge it’). This is great for fine tuning the placement of objects, but it can be really slow if you need to move it any sort of distance and you often have to resort to the move tool.


    If you hold down the ‘Shift’ key while pressing the arrow keys you super charge the Nudge and move the item much quicker. (10 times the normal nudge distance.)

    Monday, 7 October 2013

    Revit Frustrations, Adding Shared Parameters, Views Referencing

    Let me begin this comment by saying that Revit is a great tool and I am so glad that I changed over from AutoCAD when I did, here comes the ‘but’…..but sometimes there are so many little things that drive me nuts and they seem like they would be a simple fix for Revit to incorporate into their software……

    So here are a couple of my frustrations……

    Adding Shared Parameters

    When I am adding Shared Parameters, in the Parameter Properties dialog box as a default it is set to Project or Family Parameter, and rightly so, but if I need to add a Shared Parameter, first I have to activate the Shared Parameter and then I have to click the ‘Select’ Button.

    Why can’t the ‘Select’ button be enabled when first entering the dialog box? This would save a click!
    I know it isn't the end of the world, but it gets annoying when you are adding Shared Parameters often……


    Views Referencing Sheet

    This has been around for a while, and it is still there!!!
    On some of our larger projects where we are creating and duplicating lots of views we sometimes get into a situation where when we place a view onto a sheet it doesn’t back reference the sheet we want.

    Revit finds the first sheet number in the sheet list that the view is visible in and uses that as the default. Most of the time this is correct, although sometimes the default is not what you want! It is greyed out too, so you can’t manually adjust it.

    Why can’t we have a drop down list of all relevant views?


    The work around has been around for a while, below is a brief outline on how to fix the problem…..

    I like to go to the incorrect referenced sheet and activate the view and then ‘hide in view’ the marker in question. (A lot of the time, even if it is outside a crop boundary it will still show, so you will have to un-crop the view, hide the marker and then re-crop the view)

    Keep working through the sheet list with this process until the final view is referencing the right sheet, then you give the view marker crop region a little adjustment, ever so slightly (you can nudge it with the arrow keys).

    Then you can go back up the sheet list and ‘Unhide in view’ all of the view markers that need to be turned back on. Because we slightly adjusted the correct view marker the ‘Referencing Sheet’ will stay referencing the view.

    The second solution is to not back reference!!! (sometimes this isn't an option, refer to work around 1)


    These are just a couple of bugs in Revit that I always have my fingers crossed…..maybe it will be fixed in the next version…..but no, disappointed again!!!


    Somehow it seems so much better to write it down and get it out rather than sitting in a corner crying about Revit not playing the way I want!!! 

    Thursday, 3 October 2013

    Quick Filter Category Selection

    If you are creating a new Filter, and you have the items selected that you are going to filter, then select the New Filter button, it will preselect the Categories for you.


    Space Bar Orientation

    When placing Family Elements in Revit the ‘Spacebar‘ can be a real time saver.

    When you are about to pick a point to place the Family Element, Hit the spacebar to change the orientation of the Element. 


    Quick Parameter Calculator

    For those of you that don’t possess a calculator for a brain, (myself included).

    In the properties on an element, if you need to work out a value and you can’t be bothered opening up the calculator in windows (or your phone). The simple solution is to type the formula into the Parameter section you require. The only thing to remember is to put a equals sign first = .

    This will give you the result you require. (Note: the formulas can be as complex as you like, not just simple additions)


    You can also add formulas to temporary dimensions when you are moving or copying and element. Just put an equal sign in and type the formula.


    Deleting Dimensions

    If you have a string of Dimensions, and you want to get rid of just one of the Dimensions in the string.

    Just hover you mouse over the dimension in the string, hit the ‘Tab’ button and then hit the ‘Delete’ button. And it will remove the individual dimension.

    You don’t need to select the dimensions and go to the “Edit Witness Lines” tool in the Ribbon or recreate the dimension string.


    Voids in Families

    When you are creating Revit Families, if you need to add a void to the Family to cut elements that are modeled in the Family, it is easier to create the form first as a solid element and then in its properties change it to a void. If you create a void straight away it will try and cut all of the existing elements in the family. 

    This way you can select the objects that you want the void to cut (using the Cut tool, in the modify ribbon). You are in control!!!


    Ribbon Tool Bars

    If you would like to change the order of your Revit Ribbon you can drag the different toolbars to alternative locations.

    All you have to do is click on the Toolbar Heading (at the Bottom of the Tools) hold you left mouse button down and drag it to a new position.

    You can also undock the Toolbar by dragging it into you modelling space and letting it go.

    They can be re-docked the same way or on the right hand side of the undocked toolbar there is a re-dock button.


    Duplicating Sheets in Revit

    If you have an existing set of sheets and you would like to duplicate one of the sheets to add another to the set without having to go through the process of going up to the View Ribbon and creating a new sheet and then applying all of the Parameters again. Revit won’t allow you to duplicate sheets, but there is a quick and easy work around to save you time.

    • Go to the sheet you would like to duplicate in the Project Browser
    • Select all of the Views on the Sheet (this includes the Model views, Drafting Views, Legends and Schedules)
    • Hit the Delete button (don’t freak out, we will undo this later)
    • Right-Click on the sheet name in the Project Browser and choose "Copy to Clipboard"
    • Go to the Quick Access Toolbar and choose "Undo” and select the latest “Delete Selection”, this will bring back the views we deleted before. (notice it does not undo the Copy to Clipboard)
    • Go to the Modify Ribbon and choose "Paste from Clipboard"
    • You now have a new sheet without having to recreate all of those parameters. 
    • Just to be sure go back and check the original sheet to make sure everything is still there

    Wednesday, 2 October 2013

    Revit Bug Fix - Multiple View/Sheet Selection in Project Browser

    This is something that has been driving me nuts and finally a solution.

    For some reason, all of a sudden my Revit started to act a bit funny, when I tried to select multiple views or sheets in my project browser and change a parameter, it would only change 1 View or Sheet, not the entire selection. This means that to change a parameter for multiple views or sheets I could take a very long time on a big project to go down one by one. Not Happy!

    This had to be a Graphics problem as it worked on other PC’s, so with a bit of experimentation a very unusual solution!!!

    It is to do with your Desktop Theme!

    Select the Windows Control Panel.


    Select Display…


     Select Personalization….(at the bottom of the dialogue box)


    Change it to the ‘Windows 7 Basic’ Theme….


    You might have to Reboot your computer for this to take effect, but next time you are using Revit it will allow you to use your Project Browser properly (or as it is supposed to work).

    (Another way to access these settings is to right-click on your desktop, and select Personalize)

    Happy Days!