Tuesday, 2 June 2015

Synchronising Faster

When you are in a workshared project, synchronising can be a time consuming process. One way to speed up the process is to synchronise in you ‘Synchronise with Central’ view, this is a drafting view set up especially for synchronising the model.

To help this process, once you have made the ‘Synchronise with Central’ view current, use the ‘Close Hidden Windows’ tool to close all other views of your model.


Thursday, 28 May 2015

Quick Access Toolbar Location

If you don’t already use the quick access toolbar then you should consider it. You can place all of the tools you use all of the time in the one location rather than having to access their location in the Ribbon.

Just right-click on the tool and you will see an option to ‘Add to Quick Access Toolbar’. This will place a shortcut of the tool in the quick access toolbar.


Another tip that may help is to position the Quick Access Toolbar below the ribbon. This will make it more visible, and give you more space to add additional tools (it can get a bit cramped at the top of the screen!)

Just right-click on the Quick Access Toolbar and you will have an option to show it below the Ribbon.


Lastly, you can add other tools to the Quick Access toolbar, like the Type Selector drop down box. This will adapt to the tool/content you are selecting a type from.


Thursday, 7 May 2015

Opening Project - Worksets

A faster way of opening your work shared project is to specify what worksets you would like to open during the file opening process. That way you have total control on exactly what will be visible, and not have to load any information that is not required for you current requirements.

Select the workshared projects you would like to open, then select the down arrow beside the open button. This will activate the Workset options where you can select the worksets you would like to have activated.


Specify is a great option for individually selecting the specific worksets you require, it is also a great choice for file maintenance where you can choose to have no worksets open so the file opens a fast as possible.

Wednesday, 6 May 2015

Wall Joins

Revit will make some great assumptions for you when you are creating you model. One of the assumptions which may not meet you exacting needs is the way Revit will automatically join the walls.

By default Revit will use a butt joint with the wall being more dominant at its start point, and less dominant at its end. The wall joint by display will automatically clean up the intersecting wall layers. You have various options to adjust how the walls join.


To modify the way the walls intersect, select the ‘Wall Joins’ tool (in the Modify ribbon) and select over the intersection in question.


In the Options bar you can change the configuration of how the wall intersects. The Previous / Next buttons adjust the Butt joint, the Miter (Mitre) option is a great way of having all finishes meet up on the corner, without any overlap, Square off allows you to join the walls at 90°no matter what angle they intersect.

You can also Change how the Join is displayed and whether you would like the join cleaned.

In the end, you don’t have to live with the Revit assumptions.

One last tip with altering a walls join, think about how the wall is joining in its entire height, the join at the bottom may not be the same as it is at the top.

Thursday, 30 April 2015

Revit in Feet

Revit is programmed in Feet, even though you have installed a Metric version of Revit. In general you will never really notice, but there are some subtle instances where it becomes apparent....an obvious one is when you are exporting a model for rendering in 3DS MAX, but there are some other instances......like some of the Addins.....

When you are using some of the Addin’s that have been developed in America, because they work in Imperial the units are hard coded into the API. The result is that when we are using them in the southern hemisphere (metric) you get some crazy results and it isn’t enough to just change the units in our project/family.

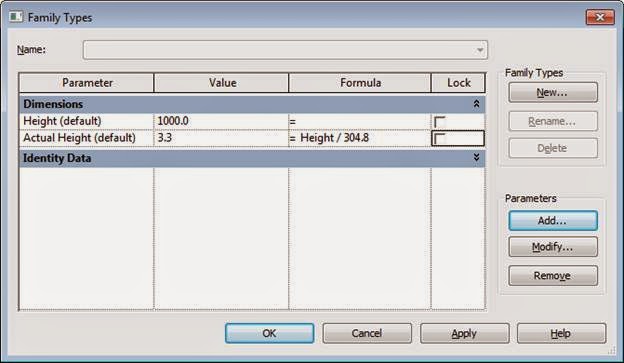
To get the Addin’s to work properly, a simple conversion parameter formula is required, to get the units set correctly, this can be built into Component Families.

A couple of the Addin’s that require this conversion formula are the ‘DP Randomiser’ and the ‘Set Parameter Values from Image Data’

The example below is for setting a height, but this can be adapted for other parameters.

Because the Addin’s are imperial and set in feet, we need to create a parameter that divides the height but 304.8

1 foot = 304.8 millimetres

The ‘Actual Height’ parameter controls the family and the ‘Height’ parameter is controlled by the Addin.


Wednesday, 15 April 2015

Scheduling Available Fields

When you are creating schedules in your project, not all the fields will be available by default. If the field you are after isn’t in the default list you can select additional available fields from the additional options in the bottom left hand corner of the Dialogue box.

In the example below, I am creating a door schedule and I am trying to get some Room based fields to show, they can be accessed from the ‘Select available fields from:’.


Monday, 13 April 2015

Snap Close

When you are drawing an outline in your project or family a handy little keyboard shortcut is ‘SZ’ this is the Snap Close command. This moves your mouse from the last point selected to the start point, thus closing the loop.

This works with any element that is created by selecting points, like walls and sketch outlines.

When you get to the second last point, type ‘SZ’, this will move your mouse cursor to the start point of the sketch and then pick with your left mouse button, (ensure you pick with the mouse or the element won’t be closed).