Wednesday, 31 May 2017

Turning Off Everything

If you need to turn off all of the Model Categories, Annotation Categories, Analytical Categories or the Imported Categories in your model view, there is a really fast way without having to select Categories individually.

(This process can be very useful to determine what is modeled and what is annotation in the view.)

If you open the Visibility/Graphics Overrides dialogue box. In the top left corner of each Category Tab, there is a tick box ‘Show model categories in this view’. If you untick this box it will hide everything listed below in that tab. (For this example I was using the Model Categories tab, the other tabs tick boxes are named accordingly)


Alternatively for model elements you can use a parameter in the View properties dialog box, that will allow you to change Model Display from "Normal" to "Do Not Display"

You also have an option to "Halftone" model elements.


Friday, 5 May 2017

Selection Filter Alternative

When you have multiple elements from multiple categories selected in your model, an even quicker way to filter your selection is to select the pull-down menu just below the Type Selector. This will show the categories that have been selected and you can pick the category to filter.

This filter should be primarily used for smaller selections in your model.

It doesn’t work like the traditional filter, but it allows you to filter to a Category and alter the Parameters only. If you try to move or copy it will alter everything initially selected.


Another limitation to this filter selection, is that you can only select one category to filter.


Tuesday, 18 April 2017

Brisbane Computational Design Group April Meeting


I am co-chairing the Brisbane Computational Design Group. Meeting are on the first Wedesday of each month (apart from April when it will be held on the Wednesday the 19th)
6pm to 8pm
Agenda and Venue to be confirmed prior.


Twitter: @compDesGrp
Slack: brisbanecdg.slack.com

Thursday, 16 March 2017

Parameter Type/Instance Switching

When you have multiple dimensional parameters in your Revit family, a quick way of switching between a ‘Type’ and ‘Instance’ parameter is to select the dimensioned parameter, and in the options bar you can select (tick or untick) the Instance Parameter option.

This will change it between a ‘Type’ and ‘Instance’ parameter without having to go into the ‘Family Types’ dialogue box.


Note: This only works on visible parameters (ones you can select). All the others you will still have to go to the ‘Family Types’ dialogue box. 

Sunday, 5 March 2017

Line Length

If you select a line in your model and look in the instance properties dialogue box you will see that it will display a ‘Length’ parameter value, giving you the length of the individual line. If you are lucky enough it will also display a temporary dimension showing the length.


If you would like to determine the total length of multiple lines joined together (Chain of lines), this can only be achieved with Model lines.

Under the Modify Ribbon select the ‘Measure Along an Element’ tool and then select the chain of lines. This will display the ‘Total Length’ in the Options Bar.


If you would like to determine the length of multiple Detail lines, simply select the chain of Detail lines and use the ‘Convert Lines’ tool in the ribbon above. This will convert the line work to Model lines, now you can utilise the ‘Measure Along and Element’ tool. Once the ‘Total Length’ has been determined, just convert them back to Detail lines using the same ‘Convert Lines’ tool.


Sunday, 26 February 2017

Double Clicks

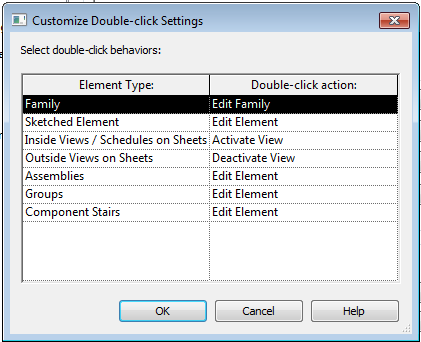
If you ever wanted to define how Revit elements react to a mouse Double-click.


If you go to the Revit Application Button ►Options ►User Interface ►Double-click Options and select the Customize button, you will be able to adjust how Revit reacts when you double click elements.


Another nice Double-click tip is when you Double-click the middle mouse button (scroll wheel) it will Zoom to Fit.


Sunday, 5 February 2017

Visibility Graphics and Linked Files

When you link Revit models into your project, Revit allows you to control their visibility graphics in your host file. This can be controlled many ways….

By Host View – Visibility graphics is controlled by the host view.
By Linked View – You can use a view in the linked file to set the visibility.
Custom – You can independently control the visibility of the linked file.

When you select on the Revit Links Tab in the Visibility Graphics dialogue box, it will list all of the Revit links being used in the current project. If you expand the Revit Link, you will notice that there is a sub-category to the Revit link. This is the individual instance of the linked file and it can be controlled individually.

Changing from ‘Not Overridden’ can cause major headaches in your project file if you start manipulating the instance (sub-category) display settings unnecessarily, it makes visibility settings hard to find in views. Normally there is no need to adjust the visibility of the instance of the linked file, especially if there is only one instance (sub-category).


Please leave this as ‘Not Overridden’!


Use the main category of the linked file to control the visibility.

The only time you need to adjust this setting is if you have multiple instances of the linked file in your project that need to have their visibility controlled individually.