Thursday, 30 April 2015

Revit in Feet

Revit is programmed in Feet, even though you have installed a Metric version of Revit. In general you will never really notice, but there are some subtle instances where it becomes apparent....an obvious one is when you are exporting a model for rendering in 3DS MAX, but there are some other instances......like some of the Addins.....

When you are using some of the Addin’s that have been developed in America, because they work in Imperial the units are hard coded into the API. The result is that when we are using them in the southern hemisphere (metric) you get some crazy results and it isn’t enough to just change the units in our project/family.

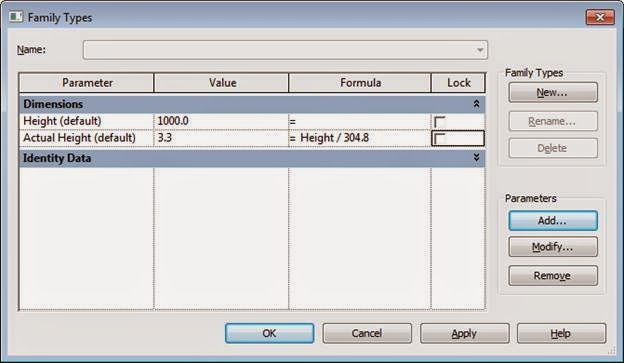
To get the Addin’s to work properly, a simple conversion parameter formula is required, to get the units set correctly, this can be built into Component Families.

A couple of the Addin’s that require this conversion formula are the ‘DP Randomiser’ and the ‘Set Parameter Values from Image Data’

The example below is for setting a height, but this can be adapted for other parameters.

Because the Addin’s are imperial and set in feet, we need to create a parameter that divides the height but 304.8

1 foot = 304.8 millimetres

The ‘Actual Height’ parameter controls the family and the ‘Height’ parameter is controlled by the Addin.

Wednesday, 15 April 2015

Scheduling Available Fields

When you are creating schedules in your project, not all the fields will be available by default. If the field you are after isn’t in the default list you can select additional available fields from the additional options in the bottom left hand corner of the Dialogue box.

In the example below, I am creating a door schedule and I am trying to get some Room based fields to show, they can be accessed from the ‘Select available fields from:’.


Monday, 13 April 2015

Snap Close

When you are drawing an outline in your project or family a handy little keyboard shortcut is ‘SZ’ this is the Snap Close command. This moves your mouse from the last point selected to the start point, thus closing the loop.

This works with any element that is created by selecting points, like walls and sketch outlines.

When you get to the second last point, type ‘SZ’, this will move your mouse cursor to the start point of the sketch and then pick with your left mouse button, (ensure you pick with the mouse or the element won’t be closed).


Sunday, 22 March 2015

Text with Border

If you need to create text with a border around it, you don’t have to draw lines manually, there is an option in the text type properties.

This means that it is part of the text, and if you need to relocate the text or change the content the border will automatically adjust.


Just select the text, go to the ‘Edit Type’ button and in the Type Properties dialogue box, just tick the ‘Show Border’ Parameter.

Remember: This is a TYPE property, so it will change all of the text of that type. You may need to duplicate the type!


Thursday, 19 March 2015

Cutable Families

When you are creating Families in Revit some of the categories are unable to be shown cut in a plan or section views. This means that they will always show up as an elevation.

An easy way to tell which family categories can be shown cut is to refer to the ‘Object Styles’ dialogue box.

All of the Categories that are greyed out don’t show as cut in any views.


Monday, 16 March 2015

Moving Views to a Different Sheet

When you have views placed on sheets in your Revit project, inevitably you will need to move them to different sheets once they have been placed. You might think that you need to delete the view on the sheet, open the new sheet and drag the view onto the new sheet. This can be a time consuming process….but there is an easier way!

If you use your project browser, it can save you a lot of time by using the click and drag. 
  • Expand out the Sheet views you are going to move in your project browser.
  • Select the view you would like to move
  • Hold down the left mouse button and drag it to the new sheet.
  • The sheet view will open and you just need to position it on the new sheet.


Thursday, 12 March 2015

Revit Tip - Hiding Revision Clouds

When you are issuing revisions of your Revit model, they are controlled by the Sheet Issues/Revisions dialogue box, which can be accessed through the Manage ribbon ►Additional Settings. If you want to hide revision clouds from a previous issue, there are a few ways you can achieve this, and they all have individual consequences. The preferred option is outlined below.


No Cloud and Tag, but keep the Revision.

If you want to hide the clouds (and tag) but keep the revision in the schedule in the title block, go to the Manage Ribbon ►Additional Settings ►Sheet Issues/Revisions. This will activate the Sheet Issues/Revisions dialogue box where you can select the revision in question and under the Show column change it from ‘Cloud and Tag’ to ‘None’

This will hide the revision clouds on all the sheets that have this revision, whilst retaining the revision in the schedule.