Sunday, 26 June 2016

Display Model

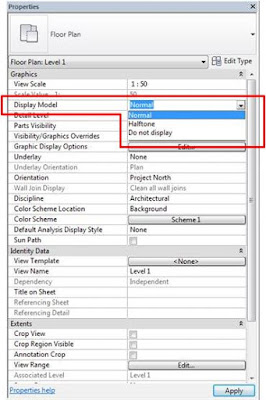
A quick way of altering the visibility of modeled elements in a Revit Project is to use the View Properties, Display Model parameter. This will allow you to alter the appearance of all Model elements, leaving the Detail elements unchanged. All without having to alter the Visibility Graphics dialogue box.

In your orthographic views properties, the Display Model parameter allows 3 settings.

Normal – which will show the modeled elements as specified in their Object Styles and Visibility Graphics.

Halftone – sets a halftone appearance to all modeled elements.

Do not display – will turn off every modeled element, leaving just the detail items. This is a great option to see what has been modeled and what is detailed.

Friday, 17 June 2016

Snap Increments

When you create, place or relocate elements or components in your Revit model, Revit uses a predefined set of snapping dimensional increments. For example, when you are drawing a wall and you move your mouse from the start point to the end, you will notice the temporary dimensions increasing be certain amounts, these are the Snap increments.


If you would like to adjust the snap Increments, go to the Manage Ribbon, and select the Snaps tool. This will bring up the Snaps Dialog Box.


You can adjust the Snap Increments for Length and Angular control. You can add as many increments as you like, they just need to be separated by a semicolon.

The different numbers help you control the increments when you are zooming in your views. For example, if you zoom in on your model to look at a detail, then Revit will adopt a smaller value, if you zoom out in the same view it will adopt a bigger increment value. It works off a screen value of 2mm. (There is a little tip on how it works at the top of the dialogue box, under the Dimension Snaps title.)

Sunday, 12 June 2016

New Plan View Creation

When you need to create additional plan views of your Revit model, the temptation is to find a view that is similar and right-click on the view name in the project browser and Duplicate the view, either with detailing or without.

Whilst this method can give you exactly the result you are after, there may be parts of the model that have been overridden in the view which you may not know about, it is often better to start with a fresh plan view and apply the specific view template to give you the finished view.

To create a new plan view, go to the ‘View’ ribbon and select the ‘Plan Views’ tool. This will allow you to select the type of view you require.


The resulting dialogue box is usually blank when it appears which makes it a little difficult to create a new view. There is a tick box at the bottom ‘Do not duplicate existing views’, just untick it and you will be able to select the Levels available.


This will give you a fresh plan view which you can now apply the correct view template.

You can still use the right-click, duplicate view, this process just gives you another option.